When I first started Web Development, like everyone else, I also wished for an
online Portfolio and super cool blog running on WordPress-like sites. But upon
digging deep into it and spending some time on Web Development, I came to know
about this awesome feature of GitHub, GitHub-Pages, where you can host and
serve any number of static-sites for “free” with site names like username.github.io/project-name . So why not
use this free feature and host a Personal portfolio and also a blog built
upon HarpJS a static-site builder built upon Node that preprocesses the
blog/anything just to HTML, CSS & JS.
ProTip : Better to use Cloud9 online IDE for dedicated work space and testing
Getting Started
First, you’ll need to install Git, NodeJS, HarpJS.
Familiarity with Git is helpful, but not a prerequisite.
Next, head to GitHub, create free account and explore the site.
Done with that ?
Now, open the command prompt. If you’re not acquainted, that’s okay: it’s only needed sparingly. Now practice some basic syntax for Git and MarkDown( you need to write your blog in this ) .
1
2
3
4
5
6
7
8
9
10
11
12
13
14
15
16
17
18
19
20
21
22
23
git init
// initialises am empty git repository
git remote -v
//lists out the connected URLs to Github repos
git remote add origin <url>
//adds a url to existing repo on local machine
git remote set-url origin <url>
// sets/ modifies the url of existing repo on local machine
git clone <url>
//create a working copy of a local repository by running the command
git add -A
//adds or stores the changes
git commit -am "<message>"
//commit or finalise the changes
git push origin master
//sync the change with remote-url
 MarkDown CheatSheet
GitHub-Pages & Hosting
GitHub Pages lets you turn GitHub repositories into websites that showcase your portfolio, your projects, their documentation, or anything else you want to share with the world. What’s the advantage ? You don’t need to update your site every time you modify your sites’ source code. GitHub automatically does it. “Everything just works” . Check out to their video to know what exactly it does and why I am very much fond of it.
Ok, so you are now familiar with Git, GitHub, MarkDown, GitHub pages. Now, its time to dive in.
Go ahead and create a new repository in GitHub named
username.github.io, where username is your username on GitHub. Repository
should be public for publishing. Add a license of your own choice ( optional ) .
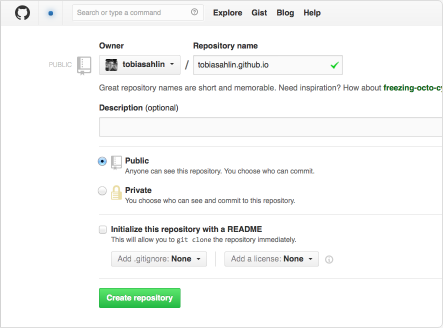 GitHub Repo creation
Clone the Repository to your local system
1
git clone https://github.com/username/username.github.io
Lets test it now, run the following commands in your Command Prompt or Terminal.
1
2
3
4
5    cd username.github.io
    echo "Hello World" > index.html
    git add --all
    git commit -m "Initial commit"
    git push -u origin master
You’re done. As simple as that. Now wait for 5–10 minutes. Fire up your browser and go to
Yippee, your personal site is now running Live.
Rules & Best Practices
There are certain rules to be followed while publishing your site on GitHub-Pages.
- “index.html” file should be at the root of your repository
- Your repository should be made as public ( already done! )
- You can only publish static-sites on GitHub-Pages. (Static vs Dynamic sites)
While building up your site, it would be a convenient for fellow developers to explore your repository if you have a good file structure. One good-olden convention is mentioned below.
▾ /
  ▪ styles/
  ▪ scripts/
  ▪ images/
  ▪ index.html
Make sure commit your project at various stages of development. In case you are not satisfied with the final output, you can revert back to earlier commits and start building again.
Next ?
Nothing, for the Portfolio.You are now well acquainted. Start brain-storming and build an awesome Portfolio to showcase yourself and your projects on The Web.
Here is mine as an example.
Portfolio Wrap up
Congratulations! You are now done with your Portfolio *( assuming you have completed all the tasks *:) and came here ). *Try to *make it visible and reachable from the web, link other social accounts into it. Use Facebook debugging tools to scrap your site and look into its suggestions.
To change or update it later, at any time, you only need to change the its repository and changes will live soon.
Next ?
Blog with HarpJS

I am pretty sure you would be wondering what is this HarpJS and how does it help us in hosting our blog. Let me clear these things first, HarpJS is a static-site generator that automatically preprocesses code and serves it to the browser as HTML, CSS, and JavaScript. Now you can focus on writing/blogging instead of wrangling.
( If you are wondering why static-sites instead of wordpress and likewise platforms, check about it here )
Head on to Github and create a new repository with the name of your blog, your
final bog will be hosted at <username>.github.io/<blogName>. Then ,go to settings, choose your master branch as
github-pages site.
I am assuming you have already installed HarpJS as suggested in Getting Started section. So, without further due, lets start building our stuff. Create and to an empty folder where you want to create and initialise your new blog over. ( Use Git for version control with remote earlier created repo remote-url).
1
harp init my-harp-blog
This creates a folder named my-harp-blog, looks as follows.
▾ /
  ▪ _layout.jade
  ▪ 404.jade
  ▪ index.jade
  ▪ main.less
Now, start your server locally to test it locally using
And go to localhost:9000 to look at the rudimentary version of your blog.
Markdown, Layouts and Partials
Just skim through the documentations that are hyper-linked in the paragraph title above, to get an idea of what exactly they are and what they do.
Each Markdown file in the root directory add a new page to the blog. Go ahead
and create an About Me page with contents written in markdownwith file name as aboutme.md
.
1
2
3
4
# About Me
Hi, I am Diwakar. I love build cool stuff that helps the world. I am currently an I.T. Undergrad Sophomore in India.
Now save your file and go to localhost:9000/aboutme server running. Yup, your changes are there running
live.
(* Harp does hot-reloading/ live-reloading, so you do not need to restart your server for every change you make.* )
Layouts are used for establishing repeating structures, whether it’s a header
and footer or something more complicated. The _layout file contains this markup. By
convention, Harp doesn’t serve files or folders with an underscore preceding
their name. Essentially, this _layout.jade becomes a wrapper for the files that are
served.
The content from your about.md, 404.jade and index.jade are all brought into the layout wherever you use
the variable yield:
Now, head on to _layout.jade and make a template for your blog homepage. Here is an example
:
1
2
3
4
5
6
7
doctype
html
head
link(rel="stylesheet", href="/main.css")
body
!= yield
( The language used is *jade, you can use HTML also, Jade feels more clearer and easier once you get acquainted and robust too.*)
Notice that main.css is referenced, even though that file isn’t actually in the folder; main.less
is. Because Harp has preprocessing built in, there’s no need to have the
compiled files around, cluttering up your app. Update and save the LESS file,
and your changes are already in the browser.
Adding Articles
You might want your blog to actually have some articles. Go ahead and write a few posts. I can wait.
Now, I would like to access my first article at localhost:9000/articles/another-article , so I’ll create a folder called articles
. Folders are for people and so are URLs; make the directory structure mirror
the URL you want.
▾ /
  ▪ _layout.jade
  ▪ 404.jade
  ▪ index.jade
  ▪ main.less
  ▾ articles/
    ▪ _data.json
    ▪ a-simple-article.md
    ▪ another-article.md
There is nothing unexpected going on inside the articles I added, they are just
Markdown. Information about the articles, beyond the articles themselves, is
stored inside the _data.json file.
Flexible Metadata
Keeping metadata inside , rather than inside each individual .md file, works well
for a number of reasons:
- A file can have any amount of metadata, and it still won’t interfere with your writing.
- Metadata for posts, images, videos or anything else can be added in the same way.
- Different files can still easily make use of this
_data.json. - The order of information can come from the
_data.json, rather than requiring anything of the file name
By adding the title, date, or any other information in a _data.json file inside the
article itself, you can get the most out of using Markdown and just worry about
writing.
For this blog, I decided to just add the title in my _data.json file for now:
{
  "a-good-article": {
    "title": "A Good Article"
  },
  "a-complicated-article": {
    "title": "Another Article"
  }
}
Using Jade, it’s possible to iterate over this metadata, listing out all the
articles. I’ve added the following to index.jade.
ul
  each article, slug in public.articles._data
    li
      a(href="/articles/#{ slug }") #{ article.title }
As you’d expect, there’s a list of articles on the home page now.

This blog is still missing a way to navigate. It would be nice to have the nav
in the footer as well as the header of our layout, so it’s present when someone
reaches the bottom of an article. Harp’s partial function makes this possible without
writing the same markup multiple times.
Partials
Partial() brings one file into another. You could use any text-based file in your
application as a partial. Usually you’ll want to bring in snippets of code
rather than entire pages, but you can use partial() for either.
As with the _layout file, adding an underscore to the beginning of a file’s name
prevents it from generating its own page, which is great for snippets of code.
This convention is true for folders, too: name a folder with an underscore at
the beginning, and nothing inside will be served directly. Folders with a
leading underscore are a great place to store partials. I created a new folder
called _shared for this purpose.
Inside is a new file named nav.jade.
nav
  a(href="/") Home
  a(href="/about") About
Now, in _layout.jade, I’m using this file with partial():
doctype
html
  head
    link(rel="stylesheet", href="/main.css")
  body
    != partial("_shared/nav")
    != yield
    footer
      != partial("_shared/nav")
Now, the nav can go at the top and bottom of the blog posts without the markup needing to be duplicated. This is a simple example, but you can probably imagine how useful partials are once parts of your blog can be reused anywhere.
Sigh !!!
Going live
Once the initial version of your blog is done, it’s now time to put it online. Any Harp can be compiled to simple HTML, CSS & JavaScript files, and can be published anywhere.
1
harp compile
This command generates all the required HTML, CSS & JavaScript in folder in your blog directory. Now copy the contents of and put it in another folder, such that it contains
- index.html of
wwwat root - harp blog directory inside it
Here is the sample view of directory
▾ /
  ▪ 404.html
  ▪ LICENSE
  ▪ about.html
  ▾ articles/
    ▪  --// all articles as html pages
  ▪ index.html
  ▪ main.css
  ▾ my-harp-blog/
    ▪  --// your harp blog
Here is the repo of my blog as an example.
When you are done with this, now go to the articles folder in the root directory and edit all the html’s href property as shown below.
1
2
3
4
5
6
7
8
9
<li role="presentation"><a href="/">Home</a></li>
//edit this to
<li role="presentation"><a href="/blog/">Home</a></li>
//another example:
<link rel="stylesheet" href="/main.css">
//edit this to
<link rel="stylesheet" href="/blog/main.css">
Do this only for resources hosted by you, do not change the href of the ones hosted by CDNs
This is because all our resources are present at /blog/ instead of / for the blog. Now, any idea what is present at / ? Your Portfolio’s resources !!!
Now push your to the github repo to be hosted under Github-Pages. Head on to username.github.io/blogname
( To modify your blog later, you first need to modify the harp-blog folder, then compile it, bring the flattened HTML, CSS, JS to root, edit html files’ href in root folder, push it )
That’s it. Its a wrap. You are done !!!
Make sure to comment below your experience, any doubts or for any suggestions.
Thanks for making it till here. Happy Coding !
Here is the Medium article for this post